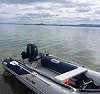
As part of trying to use my boat more I am getting it ready for using single handedly. This includes adding transom launch wheels and a lanyard kill switch.
I have fitted the wheels now and today I set out to install a kill switch to my engine. The engine is a 1992 Mariner 5hp short shaft with a remote tank. The engine has never had a lanyard style "dead man" kill switch but I figured it could't be too hard to fit one.
I did a bit of research and bought one from Force 4 with the intention of replacing the existing push button kill switch with the lanyard one.
This is where my problems started.
As you can see in the photo below, the back of the kill switch is very close to the bowl on the carburettor - too close for me to be able to fit the one I bought from Force 4.
I started looking around the engine for other possible mounting options. I could drill a hole in the lid, but that would be ugly and would mean that I would have a wire which needs to be disconnected before removing the lid completely. This could only be a last resort.
I noticed a rubber bung in the side of the bottom cowl.
I removed the bung and discovered three holes, two countersunk 4mm holes and an 11mm hole in the centre.
Time to get out the vernier callipers and take some measurements
TO THE MAN CAVE!

Step one - create an accurate model of the killswitch in CAD
Now build a box around it and add the mounting holes as per the measurements taken from the engine
Looking good, so time to print it.
Preparing the file for print using Simplify3D
As you can see, it's going to take over 2 and a half hours and cost around 72p. With electricity it should cost less than £1

Hit print and wait for best part of 3 hours.....
Done!
The parts needed a little bit of cleaning up and fettling as they were printed for strength rather than surface finish. I can stamp on it without breaking it so it should be plenty strong enough.
I dry fitted the parts using some M3 stainless bolts and nuts which I had lying around and everything fitted very well
Add the wires and tighten everything up
Now I need to splice into the wires from the existing kill switch so that I can wire the new one in parallel (so each switch works and either can kill the engine) I need to cut the brown and black wires and attach the two green ones which lead to the new switch. I used crimp connectors as solder isn't good in a high vibration environment as it cracks and breaks.
I tested the circuit with my multimeter to make sure that both switches worked without having to fire up the engine.
Having confirmed that it worked I glued the lid onto the box using cyanoacrylate (superglue).
Reassemble the rest of the engine, stick it in a bucket and test! It worked perfectly.
I went out this afternoon on the Itchen in Southampton and tested it in a real life situation (by pulling it - not by falling overboard!).
All in all I feel this is a successful mod and one I am very pleased to have done.

Not a complete idiot - some parts are missing.