New project - Seahunter 520

If you have craft other than a small Rib / Sib or Frib, Then this is the place to tell us all about it.
Canoes, Kayaks, Hardshells, Sailboats... etc
Forum rules
Please use your craft type/make/model as a header to help with the search facility.
Limecc Great Britain
Advanced Member
Posts: 235
Joined: 06 Jan 2019, 12:25
Boat Make: Ranieri Revolution 15
Outboard: Suzuki DF60a
MMSI Number: 10
Location: J28 Notts
Has thanked: 65 times
Been thanked: 62 times

Re: New project - Seahunter 520

Post by Limecc » 30 Nov 2020, 18:54

ChrisParish wrote: ↑
30 Nov 2020, 17:31
We have also been doing some more work on the engine, prior to the start of the lockdown. We have found why it was overheating. Full post on that to come once we have run it again, but here’s a hint: do not lubricate the impeller with silicone grease.
Nice work!
Don't leave it too long to post, I'm just about to change my DF50 impeller and would in fact have used silicon grease.

P.s. There's a seller on eBay selling matched key stainless hasps that might be useful for you.

User avatar
ChrisParish Great Britain
Supporting Member
Posts: 2049
Joined: 23 May 2018, 15:30
Boat Make: Bombard Aerotec 380
Outboard: Suzuki DF20A
MMSI Number: 235916094
Location: Poole
Has thanked: 123 times
Been thanked: 636 times

Re: New project - Seahunter 520

Post by ChrisParish » 02 Dec 2020, 07:00

As you may well know, if you have read the rest of this thread, our Suzuki DF50 is prone to overheating.
We set it up to run in a bin and fired it up from cold with the laptop attached to the ecu port. We monitored the temperature both via the software and by using an infrared temperature sensor and we noticed that the temperature around the number 1 cylinder exhaust (top cylinder on an outboard) was way higher than that of the other two exhaust ports.
We tried a few simple remedies such as running acid through the engine in the form of vinegar but to no avail.
This left is with three choices:

1) Buy a new engine - not on the cards, really.
2) Pay to have it fixed - a few calls and some Googling showed this would cost around £1500
3) Fix it ourselves.

Time to get the socket set out!

So the first job is to get the workshop manual out and read the relevant sections. Then read them again. And possibly again. I can’t over state this: read the manual!

Now it’s time to start stripping the power head.
3A17102B-629A-45DD-A67A-6EFF9897A6D9.jpeg
Lots of stuff to remove
The first things to remove are the pipe work and the fuel system, then you can get the air intake off
59C7080B-85DF-4232-A683-F58683202BB3.jpeg
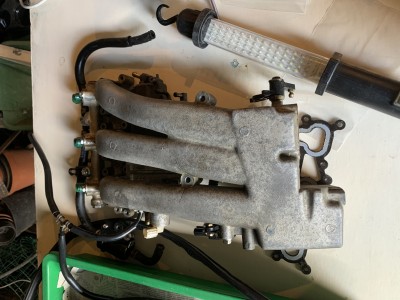
Air inlet manifold removed
775081E3-B97C-4775-B20F-8E5195474DF1.jpeg
Air inlet manifold
Then we continued to remove things as per the manual, placing all fixings into marked plastic bags and all components into trays.
177D5332-18E8-4355-B1BF-C0663F479E7E.jpeg
All neatly sorted
With all the ancillary systems removed it is time to start disassembling the power head.
Step one is to remove the rocker cover
6FB3647E-A552-4954-BBA0-B58A649D2936.jpeg
Rocker cover off
This is when we spotted the first signs that someone may have been in here before.
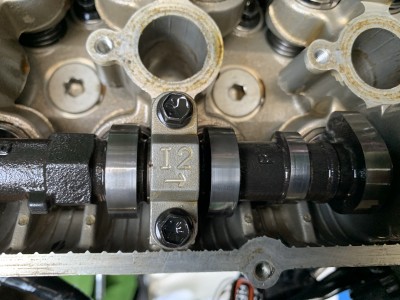
The cam shaft clamps are numbered 1 to 3 and labelled with inlet or exhaust and an arrow which sows which direction they should be mounted in. The arrow should point to number 1 cylinder which on an outboard is the top cylinder as opposed to a car, where it is the cylinder nearest the cam belt / chain (usually).
The clamps are on in the wrong positions.
62185B76-681B-481A-8AD2-019F5E355ED3.jpeg
Hmm... potential problem
This arrow should be pointing the other way and the clamp should be in a different place.
If the engine was made super accurate then it won’t make much difference, but during manufacture these parts are line bored, meaning that they are assembled onto the engine before the final machining of the inside surface to ensure that they are all perfectly aligned.
We do a bit of inspection work and decide that we will put the clamps back where they should be when we re assemble the engine. No one has run it fast with the clamps like this because the darn thing overheats first.

Right. Next step is to remove the power head from the outboard. This is pretty easy - take off a few bolts and a nut and then attach your crane (you do have an engine crane, yes?) to the lifting eye and pull that thing off!
AB73EC2B-039C-4C94-9950-A8AFD9CED2F3.jpeg
It came off easily
Having removed it we placed it on some old pillows on the bench, but left it attached to the engine crane so that it wouldn’t be possible to knock it off onto the floor if we got a bit over enthusiastic with the socket set.
728A3DD5-D3D3-4924-A03C-454717963933.jpeg
Laying on the bench but still attached to the crane
These users thanked the author ChrisParish for the post (total 4):
Limecc (02 Dec 2020, 09:18) • IanH 72 (02 Dec 2020, 09:24) • Froglet (02 Dec 2020, 10:20) • 9-R (02 Dec 2020, 13:20)
Not a complete idiot - some parts are missing.

User avatar
ChrisParish Great Britain
Supporting Member
Posts: 2049
Joined: 23 May 2018, 15:30
Boat Make: Bombard Aerotec 380
Outboard: Suzuki DF20A
MMSI Number: 235916094
Location: Poole
Has thanked: 123 times
Been thanked: 636 times

Re: New project - Seahunter 520

Post by ChrisParish » 02 Dec 2020, 12:41

With the engine safely on the bench we now need to remove the timing chain so that we can take the cam shafts out.
EEF6404E-F7D2-4809-8054-25C72FFFBC28.jpeg
Timing chain cover and oil pump removed
The chain is way to remove - you take the chain gear off the inlet cam but undoing the three bolts and pulling gently. Watch out for the alignment pin; it looks like it is fixed in but it will drop out when you aren’t looking.
6C4AEC6B-146B-4EBB-B890-FD3AA13D724F.jpeg
That’s a nice pair of cams
Now it is possible to remove the cam shafts. Don’t worry about timing or anything at this stage - that is pretty easy to sort during reassembly.
Now you need to remove the tappets. The eases that way is to use a magnet with a bit of rag on it to prevent my chipped magnet marking the smooth surface.
7E50ACEB-3591-4181-B5EE-A93BA82976A0.jpeg
Remove the tappets with a magnet
Be sure to bag and mark which tappet came from where, as they all include shims to get the cam clearance correct.
D0A04241-8F3F-4CD1-9FAE-6F67DD2A6D93.jpeg
All bagged up
With this done we are ready to split the head.
224E7CF2-DFE9-4EDE-AA48-019AB1010474.jpeg
Ready to split
The only vaguely special tool you need here is a long reach multi hex 10mm socket. By multi hex I mean a normal socket where it can fit on the bolt or nut in a number of orientations and it drives on the corners of the bolt, as opposed to a single hex which drives on the flats of the bolt.
BD96756C-DABF-41FD-AB19-1D172ECF8C1B.jpeg
10mm multi hex socket
You have to remove the bolts in a specific order as detailed in the manual and those things are tight! With all the bolts removed the head split from the block fairly easily, exposing the pistons and the crap filled water jacket.
AF2CFAFB-E302-4CB1-B283-CDB7CEB1DCB1.jpeg
Head full of snot
E1694232-02E5-4FA5-9CC6-8C5816620A53.jpeg
Block full of crud
Please note the quantity of crap in that water jacket. Many of the small holes in the head were completely blocked.

Here starts the lesson:
Upon inspection of the gunk we removed it became clear that it was composed largely of silicone grease. The only place this can have come from is the impeller. The grease has been carried into the waterways by the water and has got stuck in the fine passages in the head. Then when sand and salt as come in contact with the grease it has stuck to it, leaving an amalgam of grease, sand and salt in place.
You should never use silicone grease when fitting your impeller. If you need a lubricant to get the rubber impeller into the housing then just use a bit of washing up liquid. Yes the surfactants in washing up liquid can degrade rubber over time, but it will wash out when you first fire it up. The impeller doesn’t really need any lube because it runs in the water all the time. I believe there are some special lubes you can get if the manufacturer insists that it be lubricated. Just please, for the love of all you hold sacred, do not use silicone.
Here enduth the lesson.

We ended up going out and buying an air compressor so that we could blow the crud from the areas of the casting we couldn’t get at with a pick or a wire.

The part of the water jacket around exhaust port one was very heavily packed with crud, and because of the design of the jacket the volume of water around port one is less than that around the other two ports (the waterway tapers from the bottom to the top) so this means that it was not getting enough cooling water, and the crud had created an airlock.

A couple of hours later and the head and block look a lot better!
9EFFAE2A-F4EA-4207-AE0A-E3EC4D162017.jpeg
Clean block
9EF4C02D-FA89-4F24-B364-FFF545FEE31B.jpeg
Clean head
We checked that the head was still flat (it was) and then proceeded to refit it using a new gasket
7369D820-FF1D-4816-A218-C803A9D45DEA.jpeg
Refit the head
You have to do up the bolts in two stages - you tighten them to 30nm and then slacken them off. Then you tighten to 30nm again and then you tighten to 60nm. You really do need a torque wrench for this as 60nm is surprisingly tight.
E1EB5133-DAFB-4E14-B9CD-ADE3771797A8.jpeg
Back together and torqued up
Last edited by ChrisParish on 02 Dec 2020, 12:56, edited 1 time in total.
Reason: Spelling mistakes
These users thanked the author ChrisParish for the post (total 5):
9-R (02 Dec 2020, 13:24) • IanH 72 (02 Dec 2020, 13:56) • Limecc (02 Dec 2020, 14:05) • Froglet (02 Dec 2020, 14:42) • Oldman (02 Dec 2020, 19:48)
Not a complete idiot - some parts are missing.

User avatar
ChrisParish Great Britain
Supporting Member
Posts: 2049
Joined: 23 May 2018, 15:30
Boat Make: Bombard Aerotec 380
Outboard: Suzuki DF20A
MMSI Number: 235916094
Location: Poole
Has thanked: 123 times
Been thanked: 636 times

Re: New project - Seahunter 520

Post by ChrisParish » 02 Dec 2020, 12:52

Now it’s time to refit the tappets. Dip each one in engine oil and place them back in the correct places using a magnet.
The cam shafts then go back in and the covers are placed on and torqued to 10nm.

The next job is to refit the timing chain. Remember I said this was simple? It really is.
You rotate the crank shaft until the first cylinder is at top dead centre (we did this when the head was off). Then you turn the cam shafts until the “top” marks on them are at the top and their timing marks are aligned with the marks on the casting.
Here’s where it gets clever: the timing chain has three coloured links on it; one yellow and two blue. The yellow one aligns with the mark on the crank shaft and the two blue ones align with the “top” marks on the cam shaft. If all of these align then the engine timing is correct!
D03EA35C-407B-4D48-9AD2-4A04106A3975.jpeg
Bright yellow link - hard to miss that!
78BF2128-A88F-41E6-8041-685F50AD5A20.jpeg
You can just make out the links and timing marks
Having got this far we decided that we had done enough for the day and went in for dinner.
I should point out that this was pre lockdown MKII
Since then my Dad had refitted the head and reconnected the electronics, which took longer than splitting, cleaning and reassembling the head! When inspecting the tappets clearences he found that the exhaust valves on cylinder three were a bit tight - so we need to get some new shims.
C0B157DC-1934-4BB3-AB59-F3A34356350D.jpeg
Picking it up from the bench
35A906FE-E565-4352-BE8C-86E39BD07F8F.jpeg
Moving the power head back to the boat
891A4F3E-A723-4DAE-9FC7-D2BFE3E508DE.jpeg
The powerhead has landed
The next instalment of this tale will likely be after Christmas.
These users thanked the author ChrisParish for the post (total 4):
IanH 72 (02 Dec 2020, 13:56) • Limecc (02 Dec 2020, 14:09) • Froglet (02 Dec 2020, 14:42) • 9-R (02 Dec 2020, 16:50)
Not a complete idiot - some parts are missing.

User avatar
Froglet Great Britain
Advanced Member
Posts: 269
Joined: 15 Apr 2018, 13:32
Boat Make: Honwave T38 ie1
Outboard: Mariner 25hp 2s, Yamaha 6hp 4s
MMSI Number: 235918142
Location: South Bucks
Has thanked: 42 times
Been thanked: 91 times

Re: New project - Seahunter 520

Post by Froglet » 02 Dec 2020, 15:06

Interesting findings.

I suppose if that engine has done a fair few hours there's a good chance that the impeller has been checked or replace multiple times, so even the smallest smear of grease each time could have built up over the years.

Of course the problem is that most home servicing boaters will reach for the nearest grease which is likely to be water resistant which is, by definition, exactly what you DON'T want. :)

Pretty sure I used a smear of Teflon grease when I did mine, which is probably just as bad. :(

Limecc Great Britain
Advanced Member
Posts: 235
Joined: 06 Jan 2019, 12:25
Boat Make: Ranieri Revolution 15
Outboard: Suzuki DF60a
MMSI Number: 10
Location: J28 Notts
Has thanked: 65 times
Been thanked: 62 times

Re: New project - Seahunter 520

Post by Limecc » 02 Dec 2020, 15:27

Great write up! It can't be understated how valuable this is. Thank you!!

I'm going to use washing up liquid as suggested and although the impellor's only been changed one time, hope the waterways are not too clogged alternatively through lack of flushing after salt water use.

Probably the best flushing agent is automotive coolant flush but this would be prohibitively expensive due to the amount needed in the water barrel. Therefore I'm convinced the best way is to use high strength caustic TFR which is the finest and cheapest degreaser I know. You went the acidic route which seemed to make sense but we see it had no effect. Maybe caustic wouldn't either if it was that bad you had an airlock, however alkali based products ought to have the best chance of cleaning.

TFR is pretty nasty stuff if you don't wear gloves, my 'King Red' branded stuff has a 200:1 dilution ratio, I think it was less than £10/gallon. Every RIB owner should already have some for their tubes, application followed by some 303 Protectant/Sealer which is another amazing product.

User avatar
9-R Republic of Texas
Super Poster
Posts: 932
Joined: 12 Feb 2016, 13:56
Boat Make: Boston Whaler Montauk 170
Outboard: Mercury 90hp EFI
Location: The Republic of Texas
Has thanked: 204 times
Been thanked: 122 times

Re: New project - Seahunter 520

Post by 9-R » 02 Dec 2020, 16:54

Thanks for posting!

One of my friends recently had their engine flushed with a much more harsh acid to clear out corrosion and salt. Cleaned it right up and staying nice and cool. I wonder if it would have cleared out the grease you had?

Either way, a rebuild as you are performing appears necessary anyways so that you can assemble it properly instead of the hack that attempted it before.
Wrote a note said, 'back in a minute'. Bought a boat and I sailed off in it.

Limecc Great Britain
Advanced Member
Posts: 235
Joined: 06 Jan 2019, 12:25
Boat Make: Ranieri Revolution 15
Outboard: Suzuki DF60a
MMSI Number: 10
Location: J28 Notts
Has thanked: 65 times
Been thanked: 62 times

Re: New project - Seahunter 520

Post by Limecc » 02 Dec 2020, 17:12

On a different subject, what prop do you have fitted? Is it the standard 11.3/8 x 14"? How high did you set the anti-ventilation plate? Are you changing rarely serviced components like the high pressure fuel filter and engine anodes?

I bet you can't wait until you get to try the engine out properly.

Limecc Great Britain
Advanced Member
Posts: 235
Joined: 06 Jan 2019, 12:25
Boat Make: Ranieri Revolution 15
Outboard: Suzuki DF60a
MMSI Number: 10
Location: J28 Notts
Has thanked: 65 times
Been thanked: 62 times

Re: New project - Seahunter 520

Post by Limecc » 02 Dec 2020, 17:47

sonny1 wrote: ↑
11 Aug 2020, 15:27
very nice video @ChrisParish . you just cant beat sandwiches on wareham quay. i spent three nights at ridge farm camping with my boat the week before last , i launched from redcliffe farm slip
Chris does your boat go under that Wareham Bridge? Our RIB did and we went a fair way in similar glorious weather like you had. Saw some massive fish up there because of the sunlight and clear water.

We didn't have sandwiches (pre-covid), we had a pub lunch and ice cream. Very enjoyable. Kids were jumping into the water from the full height of the bridge.

We launched from the public slip at Poole with a strong wind that whipped up the water making us wet and we reflected it would have been even worse in the Excel SIB. Thankfully it went away and we dried out in perfect boating conditions. Was a little nervous around Brownsea as we were on the wrong side of the tide.

We'll no doubt do it again, the launch was the same shallow gradient as a beach launch and I'd like to try that with the new boat, also I fitted stainless brackets on the bimini with a design to allow it to quickly fold completely flat. I hope to be able to get under that Wareham bridge (and similar on the Broads maybe). Will also check out that Redcliffe farm slip.

User avatar
ChrisParish Great Britain
Supporting Member
Posts: 2049
Joined: 23 May 2018, 15:30
Boat Make: Bombard Aerotec 380
Outboard: Suzuki DF20A
MMSI Number: 235916094
Location: Poole
Has thanked: 123 times
Been thanked: 636 times

Re: New project - Seahunter 520

Post by ChrisParish » 02 Dec 2020, 18:05

Limecc wrote: ↑
02 Dec 2020, 17:12
On a different subject, what prop do you have fitted? Is it the standard 11.3/8 x 14"? How high did you set the anti-ventilation plate? Are you changing rarely serviced components like the high pressure fuel filter and engine anodes?

I bet you can't wait until you get to try the engine out properly.
I have no idea what the prop is beyond that it is stainless. There are no intelligible markings on the outside, so I will have to take it off and have a look to see if it is stamped on the inside end.

We have replaced the internal anodes and will probably do the high pressure oil filter.
9-R wrote: ↑
02 Dec 2020, 16:54
One of my friends recently had their engine flushed with a much more harsh acid to clear out corrosion and salt. Cleaned it right up and staying nice and cool. I wonder if it would have cleared out the grease you had?
We did toy with the idea of flushing with hydrochloric acid, but we thought that the blockage could be a piece of broken impeller or such like and it would take some serious acid to clear that!
Limecc wrote: ↑
02 Dec 2020, 17:47
Chris does your boat go under that Wareham Bridge? Our RIB did and we went a fair way in similar glorious weather like you had. Saw some massive fish up there because of the sunlight and clear water.
Yes it does at all but the highest tide - you do have to duck though. I have taken the SIBs up there many times.
Not a complete idiot - some parts are missing.

Post Reply

Return to “The Darkside -All other craft this way ...”